コンテキストの限界を突破する
コンテキストの限界を突破する —— 「読む」AIから、「文脈を創る」AIへの進化 ...
Z. Xingjie
2026年02月27日


Deploying static sites to AWS S3 can be a tedious repetitive manual process, but with Gitlab CI/CD, you can automate your deployment workflow efficiently.
This guide will walk you through setting up an automated CI/CD pipeline to make your development process more reliable.
静的なサイトを AWS S3 にデプロイするのは面倒な手作業の繰り返しですが、Gitlab CI/CD を使えばデプロイのワークフローを効率的に自動化できます。
このガイドでは、開発プロセスをより信頼性の高いものにするための自動 CI/CD パイプラインのセットアップについて説明します。
Automating deployment is setting up a pipeline that will automatically move your code changes to a server or hosting service, in this case an S3 bucket, whenever you make changes to your code.
デプロイの自動化とは、コードに変更を加えるたびに、コードの変更をサーバーやホスティングサービス(この場合はS3バケット)に自動的に移動するパイプラインを設定することです。
Automating deployment offers numerous advantages that enhance the development process. Some of these include:
デプロイの自動化には、開発プロセスを強する数多くの利点があります。下記がその例です:
To automate deployment, there are few steps to be performed both on the AWS side and the Gitlab side. Let’s go through them デプロイを自動化するには、AWS側とGitlab側の両方でいくつかの手順を実行する必要があります。それでは見ていきましょう:
For the pipeline to access your S3 bucket, you will need to have an IAM user with the necessary permissions.
パイプラインがS3バケットにアクセスするには、必要な権限を持つIAMユーザーが必要です。
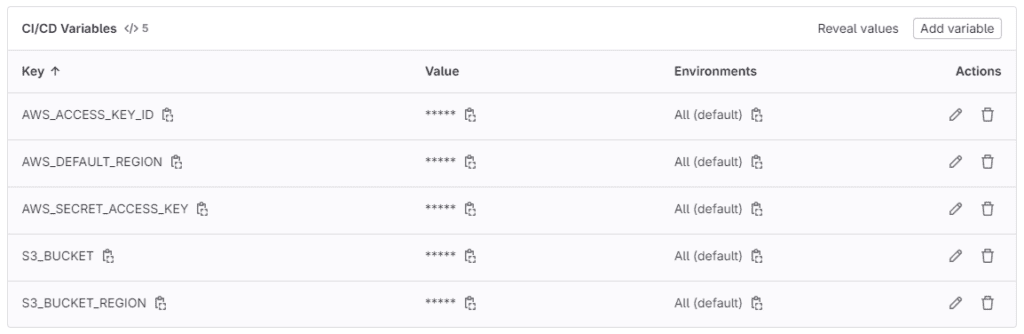
On the Gitlab side, start by setting the necessary variables within your existing Gitlab project. To do this, go to Settings → CI/CD
You will need to add the following variables:
Gitlab側では、まず既存のGitlabプロジェクトに必要な変数を設定します。Settings → CI/CDに設定してください。
以下の変数を追加する必要があります:
If your S3 bucket is in a different region from the AWS default region, as in the example below, you need to create an additional variable S3_BUCKET_REGION to store the region information.
下記の例のように、S3バケットがAWSのデフォルトリージョンと異なるリージョンにある場合、リージョン情報を格納するために追加の変数S3_BUCKET_REGIONを作成する必要があります。
The CI/CD variables should look something like this CI/CD変数は次のようになるはずです:
Now you’re ready to write your .gitlab-ci.yml file. This file defines the CI/CD pipeline stages, and the steps to deploy your files.
これで .gitlab-ci.yml ファイルの作成準備が整いました。このファイルでは、CI/CDパイプラインのステージとファイルをデプロイする手順を定義します。
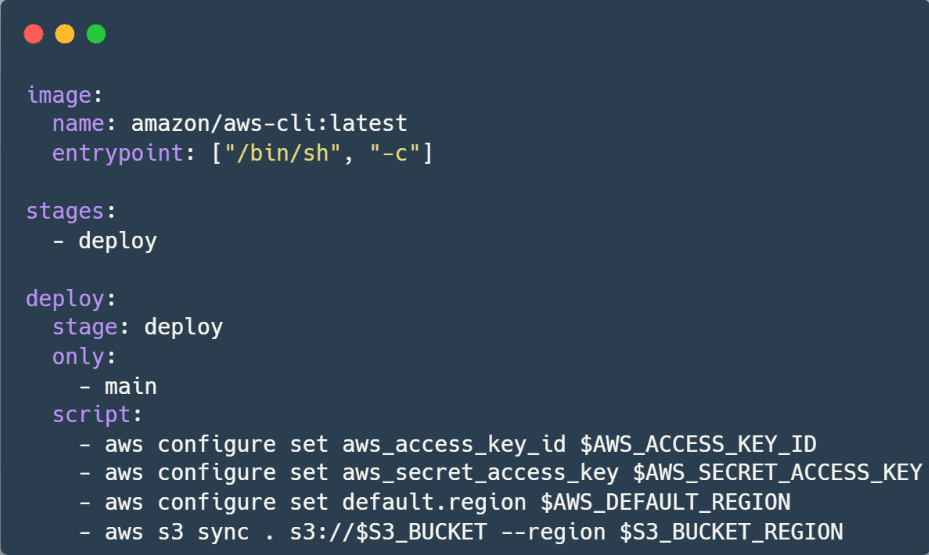
Let’s break down the above code.
上のコードを分解してみましょう。
To confirm your changes, push your code to your Gitlab branch and verify that the pipeline passes successfully. This ensures that the automated deployment process was set up correctly.
変更を確認するには、コードを Gitlab ブランチにプッシュし、パイプラインが正常に通過することを確認します。これで、自動デプロイメントプロセスが正しく設定されたことが確認できます。

コンテキストの限界を突破する —— 「読む」AIから、「文脈を創る」AIへの進化 ...
Z. Xingjie
2026年02月27日
本記事は、英語で公開されている弊社ブログ記事の日本語翻訳版です。
英語元記事:Implement Basic AUth using lambda function for S3 Website Hosting
Muntasir Ahmed MUFTI
2026年02月06日

AIによる認知能力低下? —— MITの研究結果とこれからのエンジニアリング ...
Z. Xingjie
2026年02月02日